Best Practices for Structuring a React Native TypeScript Project

When starting a React Native project with TypeScript, a well-structured codebase can save you from long-term headaches and maintenance issues. As your project scales, organizing your files, components, and logic becomes crucial to keep things clean and manageable.
In this blog, we’ll cover best practices for structuring a React Native TypeScript project, helping you maintain scalability, code clarity, and developer productivity.
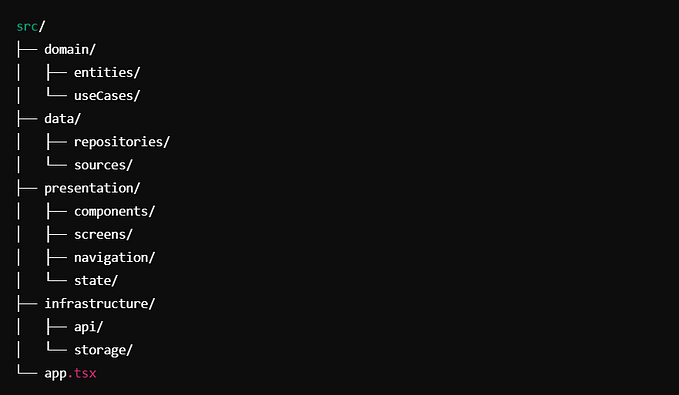
1. Set Up a Standard Folder Structure
Having a clean and consistent folder structure is key to organizing your React Native project. Here’s a suggested structure that works well for most projects:
/src
  /assets
    /images
    /fonts
  /components
    /common
    /featureX
  /screens
    /HomeScreen
    /ProfileScreen
  /services
  /navigation
  /hooks
  /contexts
  /utils
  /types
App.tsx
index.ts
tsconfig.json
package.json/assets: Store static assets like images and fonts./components: Reusable components should be separated by type. Put common components in acommonfolder and feature-specific components in dedicated folders./screens: Each screen component can have its own directory, containing the main screen component, styles, and tests./services: Place API services and integrations here./navigation: Keep your navigation logic (React Navigation, for example) in its own folder./hooks: Custom hooks related to state, lifecycle, or side effects./contexts: Context API files, if you're using React’s context to manage global state./utils: Utility functions that are used across the project./types: Store TypeScript interfaces, types, and enums in a central place.
2. Use TypeScript for Type Safety
TypeScript offers static typing, which helps you catch errors early and makes the code more predictable. To get the most out of TypeScript, ensure you have a robust tsconfig.json:
{
  "compilerOptions": {
    "target": "esnext",
    "module": "commonjs",
    "strict": true,
    "jsx": "react",
    "moduleResolution": "node",
    "allowSyntheticDefaultImports": true,
    "esModuleInterop": true,
    "skipLibCheck": true
  }
}
Make sure to define interfaces and types for your props, state, and other structures. For instance:
interface ButtonProps {
  title: string;
  onPress: () => void;
}

const Button: React.FC<ButtonProps> = ({ title, onPress }) => (
  <TouchableOpacity onPress={onPress}>
    <Text>{title}</Text>
  </TouchableOpacity>
);
3. Modularize Components
Each component should be small and focused on doing one thing well. Use the Single Responsibility Principle (SRP) when building components. This makes it easier to test and refactor in the future.
Also, organize your components by feature. For instance, a Button that is used across the app can live in components/common/, while a specialized ProfileHeader component for the profile screen can be placed in components/featureX/.
4. Centralize Navigation in One Place
Navigation plays a big role in React Native apps. If you’re using React Navigation, create a navigation folder to store your navigation logic, stack navigators, and bottom tab navigators.
For example:
/navigation
  /MainNavigator.tsx
  /AuthNavigator.tsx
Keep your routes, screens, and navigators in one place to simplify changes as your app grows.
5. State Management Best Practices
Use React’s Context API or external state management libraries like Redux or Recoil depending on the complexity of your state. For smaller apps, React’s built-in useState and useReducer are sufficient.
When using Context API, separate logic into contexts/. For instance:
// contexts/AuthContext.tsx
import React, { createContext, useState } from 'react';

interface AuthContextProps {
  isAuthenticated: boolean;
  login: () => void;
  logout: () => void;
}

export const AuthContext = createContext<AuthContextProps | undefined>(undefined);

export const AuthProvider: React.FC = ({ children }) => {
  const [isAuthenticated, setAuthenticated] = useState(false);

  const login = () => setAuthenticated(true);
  const logout = () => setAuthenticated(false);

  return (
    <AuthContext.Provider value={{ isAuthenticated, login, logout }}>
      {children}
    </AuthContext.Provider>
  );
};
For global state with Redux, create separate folders for actions, reducers, and selectors.
6. Handle API Services Efficiently
Centralize API calls in the /services directory to separate business logic from UI. Each service can handle a different part of your API.
For example:
// services/authService.ts
import axios from 'axios';

export const login = async (username: string, password: string) => {
  return await axios.post('/login', { username, password });
};
Using TypeScript, make sure to type responses and request bodies to avoid type mismatches.
7. Organize Types Separately
Place all your TypeScript types and interfaces in a types/ directory. It ensures that all the types are easy to find, and avoids duplication. You can also create separate files for different types (e.g., types/User.ts, types/Navigation.ts).
// types/User.ts
export interface User {
  id: string;
  name: string;
  email: string;
}
This keeps your codebase consistent and well-documented.
8. Write Clean, Reusable Hooks
Hooks can become repetitive if not organized well. Create a hooks/ folder and store reusable logic like API data fetching, event listeners, or form validation. Here's an example:
// hooks/useFetch.ts
import { useState, useEffect } from 'react';
import axios from 'axios';

export const useFetch = (url: string) => {
  const [data, setData] = useState(null);
  const [error, setError] = useState(null);

  useEffect(() => {
    axios.get(url)
      .then(response => setData(response.data))
      .catch(err => setError(err));
  }, [url]);

  return { data, error };
};
This custom hook can then be reused across multiple components.
9. Use Linting and Formatting Tools
Ensure code consistency by using ESLint and Prettier. With TypeScript, setting up ESLint ensures you catch potential errors and enforce coding standards.
To install:
npm install eslint @typescript-eslint/parser @typescript-eslint/eslint-plugin eslint-plugin-react --save-devConfigure .eslintrc.json:
{
  "parser": "@typescript-eslint/parser",
  "plugins": ["@typescript-eslint", "react"],
  "extends": ["plugin:@typescript-eslint/recommended", "plugin:react/recommended"],
  "rules": {
    // Custom rules
  }
}
Run ESLint to catch errors before they reach production.
10. Test Components and Logic
Testing is essential to ensure your code works as expected. Use Jest and React Native Testing Library for testing components, hooks, and services.
Create a tests/ folder or keep test files next to the modules they’re testing (e.g., Button.test.tsx inside components/common/).
// Button.test.tsx
import React from 'react';
import { render, fireEvent } from '@testing-library/react-native';
import Button from './Button';

test('Button renders correctly and handles press', () => {
  const onPressMock = jest.fn();
  const { getByText } = render(<Button title="Click Me" onPress={onPressMock} />);

  fireEvent.press(getByText('Click Me'));
  expect(onPressMock).toHaveBeenCalled();
});
Conclusion
By following these best practices, you’ll build a React Native TypeScript project that is scalable, organized, and easier to maintain. The key lies in consistent folder structures, modularization, type safety, and keeping your code clean and testable. With a solid foundation, your project will be better equipped to grow and evolve as your app and team scale.
Happy coding! 🎉
Stackademic 🎓
Thank you for reading until the end. Before you go:
- Please consider clapping and following the writer! 👏
- Follow us X | LinkedIn | YouTube | Discord
- Visit our other platforms: In Plain English | CoFeed | Differ
- More content at Stackademic.com